.png?width=250&height=125&name=TrustBuilderLogoWhiteTranspBackgr(250x125%20px).png "TrustBuilderLogoWhiteTranspBackgr(250x125 px)")

Have you downloaded a piece of content, or you submitted a "contact us" form, and all you got was a meager little in-line message saying, "Thank you! We will get back to you as soon as possible!" Where is the fanfare, the high-fives, and the cheery Thank Yous?
Kind of feels like a let down already, right? And I venture to say, this is not the reaction you want to evoke in your prospects when they just submitted your form.
Why Bother With Thank You Pages?
The work is done; the visitor has submitted the form - so why bother with a Thank-You page?
To answer this question, let's define first what a Thank You page is:
"In the inbound marketing world, a Thank You page is a page that a lead is redirected to after he submits a form. Its function is to
- Deliver the offer (e.g., Click here to download your eBook),
- Set expectations (e.g., we will schedule a meeting within the next business day)
- Offer further resources to keep the lead longer engaged, like related educational blog posts,
- Propose an additional opportunity to proceed further down the funnel, such as a logical next step call-to-action.
- It also gives the company the opportunity to make a lasting positive impression before the lead leaves the website."
So you can see this little page has a huge responsibility! Now, let's get into how to build them.

How To Create A Thank You Page In HubSpot
To create a Thank You page in HubSpot, navigate in your HubSpot Marketing portal to Content > Landing Pages.
Once you are there, click on the blue button "Create A New Page" in the upper right-hand corner.
HubSpot will pull up landing page templates for you to choose from.
Choose a template that includes your navigation, social sharing buttons, and if your offer is very top-of-the funnel, even another form (but a space for a call to action will do as well).
Now click on the template and name your thank you page. I follow a naming convention with all my Thank You pages (TY) and landing pages (LP).
Click create. The editor will open.
Now it is time to get to work and let some creative juices flow.
Pro Tip: When building a conversation path in HubSpot it is generally recommended that you start with the Thank You page first because you will need to publish it before you can publish a landing page.
However, I like to create my conversation paths in logical order since it allows me to put myself in the shoes of my future leads: landing page, Thank You page, follow-up email, call to action. If you follow this order, you will have to go back into the landing page and fix the redirect to the correct thank you page.
Elements Of An Exciting Thank You Page
So let's explore how we can craft Thank You pages that excite your lead, confirm to them that they made the right choice by submitting the form and further reinforce your corporate branding.
Start with the basics:
- Name - this is the internal name you have just given your page. You can change it here or later in the detail view. Be descriptive and use a naming convention from the start.
- Page Title - This will be your meta title for this page and would show up as the title in search results. (But since you will ask Google not to index your page, this is less important than for landing pages.)
- Page URL - This will be the unique web address of this page.
- Social Media Sharing Buttons - Copy and paste the link of your LANDING page in the field for the link. This ensures that the people who see this on social media will also fill out the form, not just land on the Thank You page.
- Navigation - It is a best practice to return your navigation on your Thank You page to allow visitors to click-through to the rest of your website if they are interested.

Now that we have the technical details out-of-the-way, let's have a look at the meat of the page.
The contents of this page greatly depend on what kind of offer the landing page was for. Is it a downloadable eBook or checklist? Was it to schedule a consultation or demo? Or register for a webinar?
Ask yourself:
- What does my lead expect to see here? What is the offer I need to deliver here?
- What crucial information do I need to provide?
- What are the next logical steps?
- Can I provide additional information to set expectations?
- What images or copy can I use to make my lead fell great?
Get Your Leads Excited With A Headline That Delivers
Think about your prospects for a second. They might now know your company yet, but they have just given you some information about themselves in exchange for that eBook, case study or toolkit that you created. They might be a little skeptical or don't know what to expect.
Now that they get redirected to your Thank you page, it is your chance to confirm to them that they made the right choice. Address their pain point and reiterate that they just solved a problem with your offer.
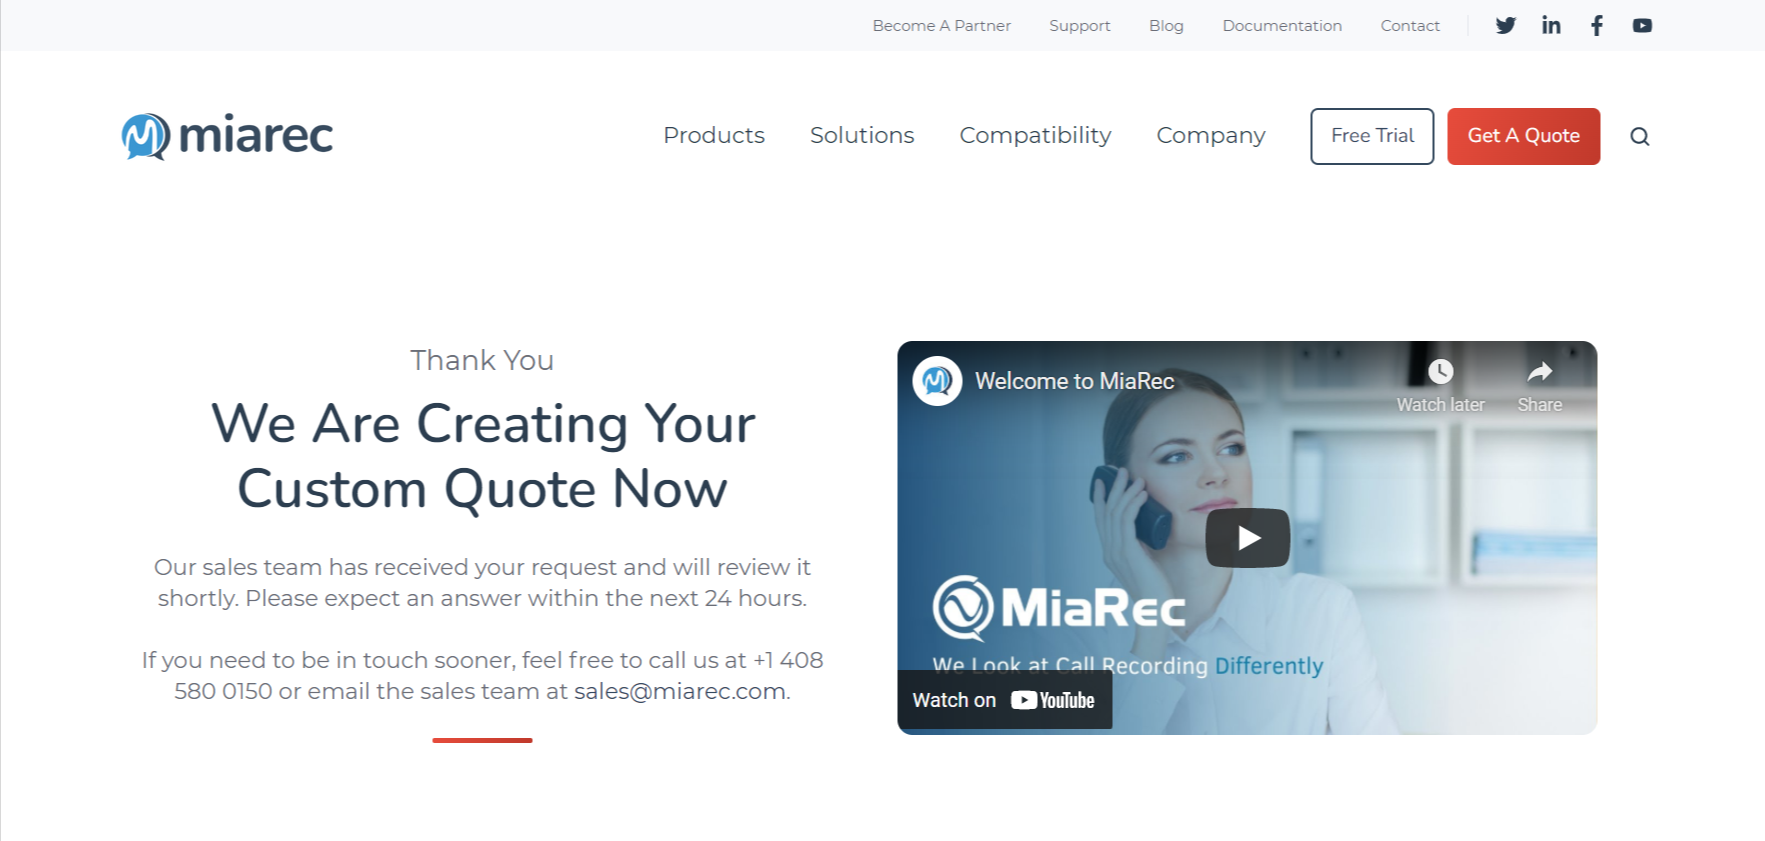
Below is the Thank You page for one of our landing pages, 10 Powerful Inbound Marketing Charts. The offer is a presentation including ten amazing charts marketers can use to convince their boss, CFO or CEO to invest in inbound marketing. The headline "Your arguments just became a lot more powerful!" reinforces that these charts will help them solve their problem (which, by the way, I totally do believe - they are fantastic.)

Deliver On Your Offer
No matter what kind of Thank You page you are creating, you need to deliver on the offer. In this case above, we added the visual of the presentation and a link that will start the download of the PDF file.
For a webinar registration, you would tell them they have successfully registered and give them the option to add the time to their calendar. You can give them the dial-in information and any pre-requisite reading material.
For a consultation, you can add a widget through scheduling apps such as YouCanBook.Me to let the lead pick a slot that best suits their needs or give them further instructions how the meeting will be scheduled.
Whatever it is, make sure it is loud and clear what the prospect needs to do to get her offer.
Additional Call To Actions
As mentioned above in the definition, a Thank You page is a great opportunity to move your leads further down the funnel by offering a secondary call to action that represents (if possible) the next step in the buyer's journey. If your offer is very top-of-the-funnel (TOFU), you can offer a middle-of-the-funnel offer. In order to minimize click-throughs, you can add a form here as well.
In the example above, we offer a free consultation if the marketer feels that they would like the help of one of our inbound marketing experts.
Call to actions can also live in the sidebar. Here, the prospect will find helpful blog posts that are closely related to the topic as well as a call to action to subscribe to our blog.
Use Copy That Reflects Your Branding
Is your company more the formal or the casual, personal kind? Use little snippets of content on your page to reflect that.
Have a look at a Thank You page by LeadPages. The voice used here is personal, light and friendly. "Everything we promised you" and "While you wait for your materials to arrive" builds a connection between the new subscriber and landing page software company.
The font of the text next to the image is kept intentionally small (most people will not bother to read this but just click the button). The clearly visible call to action uses action-oriented language. I don't have confirmation, but my guess is the click-through rate of this CTA is high.
Publish Your Thank You Page
Now that you have written your content, crafted an intelligent headline, delivered on the offer, filled out the rest of the items, and included relevant images and social media sharing buttons, it is time to publish your page.
Make sure to grammar and spell check it, and view it in the shareable preview (go to Actions on the bottom of your page) for a last sanity check.
Pro Tip: Before you hit publish , go to "Options" and add <META NAME="robots" CONTENT="noindex,nofollow"> to the header HTML section of your Thank You Page to ask search engines not to index or follow them.
Hit the blue "Publish" button on the bottom or head over to the tab "Publish" to schedule a time and date for publication and set an expiration date if applicable.
Share this

10 Best Practices To Create A High-Converting Landing Page
16 Best Practices To Create High-Converting Landing Pages in 2023
No Comments Yet
Let us know what you think